Tutorial for working with the Pwn9 Site Repo
Introduction
This is probably not of interest to most people, but could be of interest to anyone who is interested in how I have set up our development environment.
This tutorial should help you get started developing on the Pwn9 website repository. It gives you the basic details on how to get your environment set up. It does not tell you anything about how to actually work with the code base. That will come in another tutorial. :)
I created a screencast of the process, which you can watch below:
Setup for Windows 10
To begin, we’ll need to install some tools. Go and grab Git and install it. (The default settings should be fine). Additionally, you will want to install Putty and it’s tools, if you haven’t got them already.
| Tremor has suggested that the Sourcefire client is more user-friendly for Windows users. I don’t have it in my video tutorial, but you can use that client if you wish, instead. |
In order to clone the private repository, you will need to use an SSH Key. If you have previously provided one to Sage, it will already be set up for your use. You will need to copy your private key into the correct place for Git to be able to make use of it.
Finally, to run the server locally for testing, you will need to install node.js. The exact version required will be specified in the package.json file in the repository root. At the time of this writing, we are using v6.9.4 LTS. As with the other required software, the default installation options are fine.
Generating an SSH Key
Let’s walk through the creation of your ssh key, if you don’t have one, or lost yours. If you have one, skip to the next section, below. First, open the "PuTTYgen" application, and generate a new SSH-2 RSA key by clicking the "Generate" button. You will need to move your mouse around a bunch to generate some randomness. When it is done, you should see something like this:
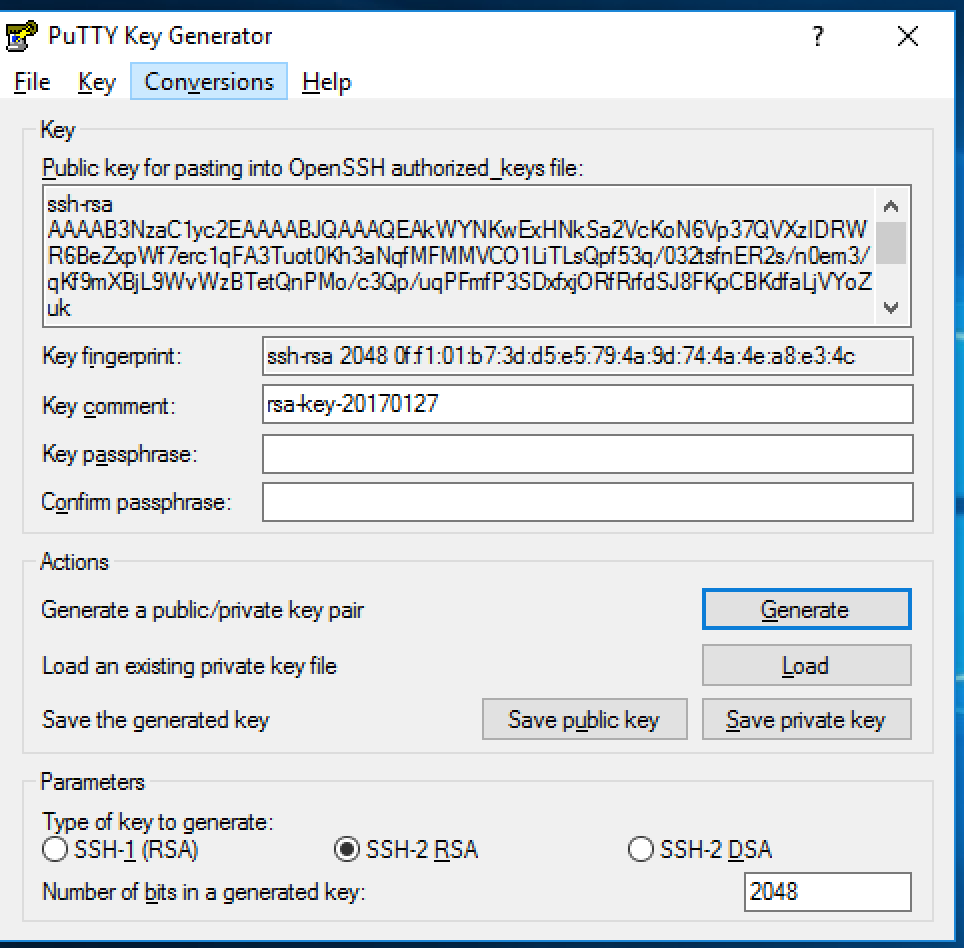
You should then enter a passphrase, to protect your key. If someone gets a hold of your keyfile, and there’s no passphrase, they can use the key to impersonate you, and do BadThings(tm). Once you’ve added a passphrase, save the private key somewhere you’ll be able to find it again.
Exporting your SSH Private Key to use with Git
Open your key in the PuTTYgen tool. Go to Conversions→Export OpenSSH Key. Save your private key in the C:\Users\<yourusername>\.ssh\ directory with a filename of: "id_rsa". (NOTE: If you already have an id_rsa here, you probably don’t want to overwrite it. If you don’t know what to do at this point, go to Chinatown. Ask for Caine. He will help.
Cloning the Repository
To clone the repository, you launch the GitUI, and put the source repository name git@pwn9.sagley.ca:pwn9site.git in the Source box, and You select a destination location on your computer. Put it on your desktop, or your documents folder, or in C:\, it doesn’t matter.
To make changes, you’ll want to check out the develop branch as a new feature branch. Do this in the Git Bash shell by cd’ing to the folder you checked the code out into, and typing: git checkout -b feature/<yourfeaturename> origin/develop. This will create a new branch, based on the latest development branch.
Setting up Node modules
After you have checked out the code repository, you will need to downlod/build the modules required for the application to run. You can do this either in the Node.js Command Prompt, or a regular Command Prompt. cd to the directory where the application was cloned, and run the npm install command:
In a 'cmd' shell:
C:\Users\sage>cd C:\Users\sage\Desktop\pwn9Site
C:\Users\sage>npm install
In a 'bash' shell:
> cd /c/Users/sage/Desktop/pwn9site
> npm install

This will take quite some time to download all of the required modules and install them.  When this step is complete, you can start work on development.
Building the Application
Thanks to the very nice tutorials done by James Shore on his Let’s Code Javascript site, I decided to use his automatopia skeleton to set up this site. What this provides is a good starting point for a basic workflow, test framework, and build system without locking into anything.
The build tool is called jake, and it is roughly equivalent to "make" or "rake" (but not "shake" and "bake"). Tasks are defined in javascript, and you can get a list of them by typing ./jake.sh -T (unix shell) or jake -T (windows cmd). You’ll get a nice list of build tasks, and their descriptions:
jake default               Lint and test
jake run                   Start server (for manual testing)
jake clean                 Delete generated files
jake lint                  Lint everything
jake karma                 Start Karma server -- run this first
jake test                  Run tests
jake build                 Build distribution package
jake version               Check Node version
To build the code base, we can run jake build. Or, we can execute jake run, which will build the code, and start a local web server that you can use to do testing on. You can reach the server by using your web browser to visit: http://localhost:5000
If you’ve done all the previous steps correctly, you should see the latest development version of the site.
The video tutorial will show you how to make a small change and push a commit, but I’m going to discuss that in the next part of the tutorial, with the whole workflow.
See [Part 2 Coming soon!] of the tutorial for more.